Thursday 1 September 2016

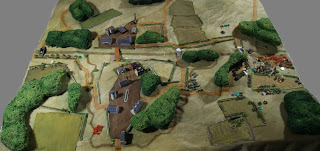
Vallées Boisées

Testing the Enemy Generator rules today, which grew out of my thinking about how to do 'blinds' for solo players.

The concept so far as I have taken it, is that the solo player picks his force and simply makes his way across the table from the starting edge to the opposite side or alternatively, towards any objectives. Initially there are no enemy units on-table but there are also no blinds or tokens of any sort, so the solo player is essentially exploring a landscape devoid of any known threats or clues.

I hate to use the term but it's a kind of pop-up WW2 skirmish game, if you will.

My army selector charts obviated the decision about what 'friendly' units to use (which is what I call the starting forces of the 'active' initial side):

Motorised Infantry Platoon
  • CO group; 2" mortar; Bren
  • 3 x NCO group; rifle group; Bren
  • 4 x Bedford OY trucks
Medium Cruiser Squadron
  • HQ: A13 Mk II; A9 CS; 3 x Mk VIB
  • 3 A9
  • 3 A13 Mk I
  • 3 A13 Mk II

4 x 47mm AT & Renault UE Carrier

[My light cruiser squadrons are A9s & A13 MkIs and my heavy squadrons are A13 MkIIs and A10s, none of which existed in those combinations, strictly speaking. Confusion prevalent in France at the time and tank availability allows some artistic licence.]


Ground scale was increased from the usual 1" = 100m (which I had used since my WRG 1925-1950 days), to 1½" = 100m, a slight increase for aesthetic reasons. Entry point was diced for, conveniently enough where there was a road. I immediately decided there should be a safe zone of 1,000m to get the 'friendlies' away from the table edge, so the leading MkVI tanks would get to the farmstead before I started dicing for enemy units.


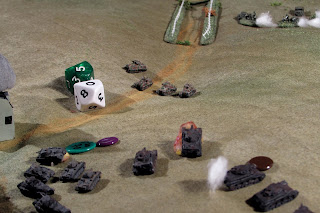
No enemy were immediately rolled on leaving the farm courtyard. First contact came in a battering of 20mm cannon from the treeline to the right where a detachment of SdKfz 222s & an 8-rad were lurking. One MkVI brewed up and the others sped off, a PzIVD troop generating in the wood round the corner as they approached. The German armoured cars backed off...


...as the cruisers fanned out across the fields. Only the speed of the light tanks saved them from the point blank Panzers' guns.  


The tougher A13MkIIs squared up to the PzIVs manoeuvring in the village back gardens and other cruisers attempted a pincer movement: A9s struggled up onto the high ground on their and the A13MkIs followed the trail of smashed saplings in the wood. Meanwhile, the armoured cars had circled around in the dead ground behind the hill crest.


Taking care not to expose any more than their turrets, the cruisers nearing the top of the ridge find their way barred by enemy infantry.


The A13s now on 'round hill' and the PzIVs slug it out at 500m; an A9 on the ridge lurches to a halt, surprised by a Panzer IV nestled in the bracken at the foot of the slope. Luckily for the British tankies, no enemy are spawned in any of the areas of concealment to the right of 'round hill' or towards the village.


A Feldwebel began to lead a section in a sneak attack around the back of the A9s.


Some good shooting from the British cruisers despatched the outnumbered and wavering Panzers to their Valhalla.

[The morale markers are 20mm clear counters from Patriot Games in Sheffield, the same place I got the 16mm green ones that I used to use and the 12mm counters in a multitude of colours for reaction and other markers (eg: pink = shaken). They are excellent people to deal with, especially if you have odd requests. The new ones are a bit bigger so easier to write on and being clear, they disappear on the table quite well].


Convinced they would get some of the AT guns facing the opposite way, the 8-rad commits himself to his surprise attack but the French gunners get the drop on him.


Partially idyllic scene.


End exercise

The enemy generator rules worked exactly as anticipated. The Germans were simply unlucky in repeatedly not spawning anything in the South East of the table in spite of the two A13 troops well within spotting distance of some good hidden positions.

Some possible tweaks:

  • Like-for-like AFV units: When triggered by infantry platoons, or gun and AFV troops, enemy will probably spawn in 'penny packets' but in squadrons when faced by such. This will quickly bring parity of forces and might push the friendlies onto the defensive.
  • Trigger roll adjustments depending on parity of forces: greater chance of enemy generation if outnumbered, less if they become more numerous.

Saturday 27 August 2016

Meanderville

I needed a tabletop layout as a basis for my introductory video on the 6mm France 1940 YouTube channel and had recently seen one with a canal centrally featured.


The hill shapes gave me high ground to the North and something of a flood plain to the South.


There were a number of crossing points over the canal as well as the silted-up part to the East, with a natural stream (traversable with care by most units) around the South of the town. The bridges were set for demolition by the Allies but I decided later that only a random number of them will detonate correctly as the German forces approach. All woods were 'open'.

(Sharp-eyed readers might notice the Panhard 178s in their old positions before I decided the marshy area was fordable.)


As the 222s neared Pont à l'Ouest, only the two Easternmost bridges directly in front of the German advance crumbled in the ensuing explosions. I decided the German CO was going to be a bit contrary and have the schwerpunkt over towards the marsh. 


The concealed 18 pdr (top right in the wood by the Pont du Marais) gets a Pz 38t long shot kill. This was unfortunately not to be repeated very often as the Panzers rolled down the open ground.


German cavalry filter through the trees like some kind of modern day mechanized timberwolves, on the hunt for prey. The 18 pdr by the pillbox plugs away at the advancing Panzers.


Various standing orders were in place in the event of certain bridges remaining intact. However, this resulted in a great deal of confusion with radio problems when new orders were issued. The briefly incommunicado Renaults began acting on their standing orders (for a couple of turns before comms was restored) and infantry with fresh instructions, were intermingling in opposite directions and seemingly with conflicting or false orders.


Medium mortars zero in on the plucky field gun crew 


Armoured cars lay down suppressing fire on the South bank to the West.


Panzers pour through the gap and the dismounted cavalry sneak into the marsh. French infantry fan out into the fields, their Hotchkiss tanks "hurtling full pelt" around the back of Horseshoe Wood.


The 2 pdr, H39s and second French platoon move towards fallback positions.


The Panhards are overrun but not before their 25mm cannons take out some Panzers first. The H39s fall back losing one tank for two and the R35s with a commanding view from near the wood pick their flank shots.


At the other side of the battlefield, suppressing fire from the 222s and platoon MG34s enables the riflemen to cross the canal but with some losses from the pillbox Vickers.


The Carrier Platoon drops back to it's 2nd position. The German HQ arrives in the area (after taking a wrong turn) to boost morale.


The German advance in the East slows in the deadly crossfire. Round after round of 2 pdr & 37mm AP slams into the Panzers.


Overlooked from two places of high ground on both sides and their morale shaken, the Germans cannot make any headway across the stubble field.

The view across town


Stubble field of destruction


Final Positions

In the West, the Carrier Platoon and a 47mm AT gun pretty much hem in the German advance on that flank; on the other side of the battlefield, insufficient room to manoeuvre has trapped the Panzers into a crossfire zone, the Allies falling back all too effectively into dominating positions. 

Unit movements

There was a lot of terrain on the board as I had only laid it out for visual effect initially. Then the restrictive nature of the canal crossing made the game even more claustrophobic for the Germans who would have benefited greatly from having even only one artillery battery of any calibre available.

Tuesday 17 May 2016

6mm France 1940 YouTube Channel

I might as well kill two birds with one stone and tell you that the finishing off of the forest tree canopies can be seen on my new YouTube channel, 6mm Wargaming, France 1940 .


That is all there is at the moment but I have lots of ideas to film and upload. There is going to be an emphasis on 'how I do things' that suit me, my style of play and what I want from wargaming, not tutorials telling you for instance, the best way to paint figures as I am the first to admit I am in the 'OK when viewed 3' from the gaming table' camp.

Vallée des Champs, 2: La Réponse

As promised, I have reused this table setup for a sort of refight or if you like, follow up counter attack by the Germans after their very quick rebuff.

Dispositions & Movements

It's not completely identical as I realised I hadn't put any hedges down in the other game and there had been only the implied 'long grass' around the edges of the fields.

The Allies started with the previous games as yet unused reinforcements on-table this time (French motorised infantry & 3" mortar troop) plus a Division Légère de Cavalrie tank squadron scrambled into the area from the rear somewhere and the original understrength units (where applicable) from the first battle:
  • understrength Char B troop
  • H39, S35 & Panhard 178 DLC squadron
  • French cycle & motorised infantry
  • 75mm field gun battery
  • Scout platoon
  • MkVIB light tank troops
  • a few 25mm AT guns
The Germans transferred in replacements and injected some much needed armour from elsewhere:
  • Kradschützen & Schützen platoons
  • StuG III & SiG33 SPG batteries
  • SdKfz 232 troop
  • Pz II/Pz 38(t)/Pz IVD squadron (from 8th Panzer Division, possibly)
  • extra Pz IVD troop
  • off-table 105mm battery
In the spirit of the period, I toyed with the idea of the Allies falling back before the start of the game, to some arbitrary line "to be held at all costs" but with the much stronger Axis forces this time I left the front line as it was.

Highly mobile German armour roared away from the junction, SPGs & infantry hoping to drive a way through the fields.

Dust clouds from the East

Scout cars & light tanks flee the wood; Belgian House still smoulders after the previous engagement/game.


An artillery duel ensues between the ancient yet serviceable French 75mms and the German SPGs.


The French cavalry fans out in the vallies and the mortar spotter in the high woods zeroes his tubes on the flanking Czech based tanks.


The devastating mortar fire scuppers the Panzer 38 flanking move. On the other side of this front, the Hotchkiss tanks trundle on down the lane.


Fast moving recce forces have been ordered to find a weak spot to exploit...


...but Boys & 25mm AT weapons pull them up sharp.


French cavalry peer over the crest of the hill.


By some twist of fate (an 01 was rolled which triggered drawing the 5♠ wildcard) the French motorised infantry beyond the wood having checked into HQ for orders, has misread the map and is heading for the wrong field.


There's nowt wrong with French armour when not used in 'penny packets', especially with shooting like that! (05)


The 150mm SPGs find their mark...


...and then turn their stubby barrels on the Char Bs.


The Schützen are already 250m away in the next field by the time their supporting Pz IVs finally get their "Vorwärts!" orders.


The diminutive H39s round the corner and force the startled Pz IIs to rethink.


More corking 37mm shots mean the German light tanks must retreat. (Subsequent losses will see them cowering at the back of the woods unable to rally, even from a modestly low score of 30).


Earth clods flying, the Panzer IVs charge into the blizzard of deadly steel (and probably tungsten as well).


The Panzer IIs reverse pell mell into the wood. On the other side of the battlefield a Char B manages to catch a StuG in the side.


The Schützen pick their way forward in the hedges & ditches, supported by 105mm barrages.


Back at the junction, as the Panzer IVs attempt to regroup, the 8-Rads begin a daring charge.


Fixated on their main opponents (one effect of their one-man turrets in my rules), the French cavalry tanks fail to notice the armoured cars slipping past.


With a Gallic shrug the French infantry start getting comfortable in a quiet meadow, somewhere in France.

"Je ne sais pas, toi?"

A shot from a Hotchkiss finds another vision block on a Panzer IV on a more or less critical hit of 01.


Then a "00" roll for the Allies draws the Q♣, a free air strike, even though 100 is the worst hit roll possible.
(The AASF must've forgotten to inform the land forces about the Fairey Battles they had tasked, which a quick look in the box reminded me that they were the only Allied ground attack planes I had which were even remotely painted).

Should get some decals on soon...

The 105 battery walks a barrage up & down the powerless Allied front line.


Cat & Mouse: a deadly game for 2 to 2 million players when using real tanks in a proper war


The 8-rads circle around the evading mortar battery, snaffling one of them like the prey that they have become.

extreme flankage!!

Back in the fields, on one side there is a bit of stand-off with both combatants on alert (my term for 'overwatch'). The Schützen, on their flank, probe forwards down the ditch & hedgerow.


The off table 105s plaster the French field gun position in the wood and the StuGs & SiG33 SPGs eventually wear down the last remaining Char B, HE proving to be the most effective form of attack on the thickly armoured beast.


The now lone Somua has had enough for now and legs it towards cover. The Panzers pop smoke to reorganize and the 8-rads are moving fast now into the British rear.


German SPGs are closing the range on the Allied front line when the 25mm AT guns finally open fire at 375m into the flank of an unsuspecting assault gun.


Now rallied, the French cavalry tank returns to the battle and the Kradschützen emerge from the undergrowth of the woods to grenade the H39s from behind. 


In the fields to the South, the French line is beaten back by the oncoming tanks, armoured cars & SPGs although a Panzer IV does fall to a Boys AT rifle, its third kill in the game.

more Balkankreuzen!

The slow Hotchkiss can barely keep ahead of the German infantry snapping like hyenas at its heels and when it slows to take the hedge it finally succumbs to the lobbed grenades. With the death of the last S35, the armour battle here is over.

H39 in a pickle

The German armoured spearhead has been severely blunted in order to gain this particular victory, losing a squadron of tanks, a platoon of infantry and two assault SPGs.

from the South

The Allies have lost a 75mm battery, a squadron of cavalry tanks, the remainder of the Char B troop and some MkVI light tanks but have clearly held up the advance in this sector due to some stout pluck and good tank shooting.

from the North West

Aside from a possible dice test (I had at least 6 wildcard draws triggered by '00's and '99's) the game was remarkably well balanced in spite of the accustomed casual and cavalier selection of forces.